I have been making this recipe for years, and while it's not at all chocolate, blueberries scream summer and scream July 4th, so I thought it would be a good time to share the recipe.
I make this coffee cake every year for Memorial Day, July 4th, and for most breakfast meetings/brunches. It's quite sweet and I have altered the recipe a little bit. Feel free to tweak it to make it more healthy too!! Yikes, Paula!
It's a little curious that it's apparently both a Paula Deen recipe and a Pillsbury Bake-off winner? Hmmm. In any case, enjoy! It's even better for dessert with vanilla ice cream. :)
 Blueberry Coffee Cake
1/2 c. packed light brown sugar
1/2 t. ground cinnamon
1 (12-oz.) can buttermilk biscuits (or as close to 12 oz. as you can find)
1/2 c. (1 stick) butter, melted (I usually use only 1/4 c. and melt just a little more if needed)
1 c. quick-cooking rolled oats
1 1/2 c. fresh or frozen blueberries (frozen works perfectly well)
1/2 c. sugar (or to taste; it's to sweeten the blueberries)
Preheat oven to 375 degrees F.
Grease a 9-inch square baking dish with the butter wrapper or cooking spray. In a small bowl, combine brown sugar and cinnamon and mix well with a fork. Separate biscuit dough into 10 (or however many come in the roll) biscuits. Cut each biscuit into quarters, and lightly dip each piece in melted butter and coat with brown sugar mixture. Arrange in a single layer, covering the entire bottom of the baking dish. Sprinkle with 1/2 cup of the oats.
 Combine blueberries and sugar in a separate bowl and toss to coat. Spoon over oats and biscuits and sprinkle with remaining 1/2 cup oats. Drizzle remaining melted butter on top (I find this unnecessary, by the way). Bake for 20-30 minutes or until cake is golden brown and center is done. (It always takes me way more than 20 minutes; use a spatula to gently lift up a corner edge of the cake to see if it's still gooey or if it has cooked through.) Serve warm.

I make this coffee cake every year for Memorial Day, July 4th, and for most breakfast meetings/brunches. It's quite sweet and I have altered the recipe a little bit. Feel free to tweak it to make it more healthy too!! Yikes, Paula!
It's a little curious that it's apparently both a Paula Deen recipe and a Pillsbury Bake-off winner? Hmmm. In any case, enjoy! It's even better for dessert with vanilla ice cream. :)
Blueberry Coffee Cake1/2 c. packed light brown sugar
1/2 t. ground cinnamon
1 (12-oz.) can buttermilk biscuits (or as close to 12 oz. as you can find)
1/2 c. (1 stick) butter, melted (I usually use only 1/4 c. and melt just a little more if needed)
1 c. quick-cooking rolled oats
1 1/2 c. fresh or frozen blueberries (frozen works perfectly well)
1/2 c. sugar (or to taste; it's to sweeten the blueberries)
Preheat oven to 375 degrees F.
Grease a 9-inch square baking dish with the butter wrapper or cooking spray. In a small bowl, combine brown sugar and cinnamon and mix well with a fork. Separate biscuit dough into 10 (or however many come in the roll) biscuits. Cut each biscuit into quarters, and lightly dip each piece in melted butter and coat with brown sugar mixture. Arrange in a single layer, covering the entire bottom of the baking dish. Sprinkle with 1/2 cup of the oats.
Combine blueberries and sugar in a separate bowl and toss to coat. Spoon over oats and biscuits and sprinkle with remaining 1/2 cup oats. Drizzle remaining melted butter on top (I find this unnecessary, by the way). Bake for 20-30 minutes or until cake is golden brown and center is done. (It always takes me way more than 20 minutes; use a spatula to gently lift up a corner edge of the cake to see if it's still gooey or if it has cooked through.) Serve warm.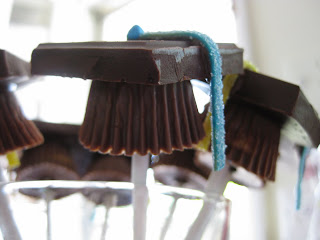 Graduation Caps
 (Bakerella gives great instructions and step-by-step pictures if you want to see it there. I just give a basic overview.) Place peanut butter cups in the freezer until firm. Remove from freezer and carefully remove the wrappers. (Otherwise, too much chocolate gets stuck on the wrapper when unwrapped at room temperature.) Let come to room temperature once unwrapped (so that you can stick the lollipop stick in each without it cracking).
 3. "Pecan filling" section: I used 10 oz. of milk chocolate chips rather than a milk chocolate bar that I chopped—mostly to save time and not have to clean another cutting board/knife. ;)
 4. "To make the filling" section: When she says to "Remove the pan from oven, and use a spatula to smooth the chocolate. I choose to make a marbled effect since the chocolates were different shades of brown."—this was a disaster for me. When I tried to marble it, the milk chocolate chips would pull up the already baked chocolate beneath it and there was no way it would end prettily. Next time, I'll leave visible chips on top.
 5. Finally, I couldn't follow the instructions to make diamonds. M had to rip the ruler out of my hands because the moms were arriving in less than five minutes. So, triangles it is!!
 I really hope you try this recipe. It's really a great one. I filed it under favorites and everything. :)
 And, to make sure each had a nicely browned exterior, I used the leftover egg whites to make an egg wash and brushed it over the top of each and finished with a generous sprinkling of sugar or cinnamon sugar.
 Well, and chocolate syrup too, of course. :)