Showing posts with label pops. Show all posts

Sunday, December 27, 2009

Hot chocolate on a stick!

Here's a cute idea I ran across this year when making my homemade gifts. This whole website is fun and creative!

Take chocolate (milk, semisweet, and bittersweet all work), cocoa, and powdered sugar. Melt together and pour into ice cube trays and insert craft sticks. Cool to room temp. Tie up in little bags with labels. The receiver just adds milk! I used these as Christmas gifts, but who wouldn't love a hostess gift like this anytime this winter?

Hot Chocolate on a Stick
makes 10 cubes of chocolate
8 oz. chocolate (any kind), chopped
1/4 c. cocoa
1/2 c. powdered sugar
pinch of salt
a few ounces of a contrasting chocolate, for dipping
festive sprinkles

In a double boiler (or a glass bowl set over gently simmering water), melt chocolate. When it is about 2/3 melted, remove from heat and continue stirring until completely melted (this just keeps it from overheating).

Add cocoa, powdered sugar, and salt and stir until well combined. Don't stop until it's all incorporated! It'll start to look better/smoother after a few minutes of stirring.

Either pipe the chocolate mixture into a clean ice cube tray (a Ziploc bag with the tip cut off works well) or use a small cookie scoop, being careful not to make a big mess of the ice cube tray so that the resulting pops will look clean and professional. Tap the ice cube tray mold on the counter to ensure that there are no air bubbles.

Add a stir stick (I found some at A.C. Moore) to each cube. It should stand up straight without any issues.

Cool to room temperature (or in the fridge if in a hurry).

Once hardened, to remove from the mold, twist the ice cube tray the same way you would to remove ice cubes. They should come right out.

To make the pops a bit more festive, I melted a small amount of white chocolate and dipped each pop in at an angle then topped with some Christmas sprinkles. Be sure to have some tall glasses or vases ready so you can prop up the dipped pops so they can dry.

They can be stored at room temp, but I recommend making them nearly the same day as you give them—my milk chocolate pops started getting speckled at room temp because I think I waited too long to cover them with plastic wrap.

If these are gifts, be sure to provide instructions for the receiver. Each ounce of chocolate should be melted into a cup of milk or cream, but since these ice cube tray pops are 3/4 ounce, they should be stirred into 3/4 cup of milk or cream when making the hot chocolate.

Bailey's/Kahlua/Schnapps/Godiva/Creme de Menthe/fluffy Williams-Sonoma marshmallows optional. ;)

Sunday, May 24, 2009

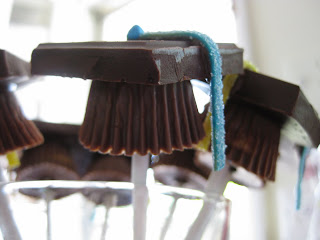
Wish-it-were-my-idea-graduation-caps

How I made it this long without knowing about bakerella is totally beyond me, but what a talented blogger. And just in time too. My friend over at ieatDC graduated from law school recently, and I knew that making her these graduation caps with her school's colors on the tassels would totally make her day! (Without hesitation, she put the whole huge thing in her mouth at once.) :)

These are pretty easy to put together, with some patience and the right supplies. Colors are customizable. :)

Graduation Caps
Miniature peanut butter cups, chilled in the freezer
Godiva squares*
Airheads Extremes Rainbow Berry Sweetly Sour Belts, cut into strips by color**
Lollipop sticks (the Wilton brand is available at Michaels or Party City)
Small handful of chocolate chips, melted (this is your "glue")
Rainbow chip sprinkles (mine are from a Williams-Sonoma ice cream topping kit; other small candies will do as well)


*Apparently found at World Market, for a price; after feeling up all the chocolate bars at Wegmans, I bought a Wegmans brand bar of chocolate that had squares approximately proportionate for the square part of the cap—but the Wegmans logo is on top, unfortunately. They were also thicker than the Godiva squares, but I was not making one more stop with chocolate already in the car trying to melt!

**I'm going to save you the trouble and let you know you can only find these at 7-Eleven in this area... not Wegmans, Safeway, CVS, Giant, Walmart, Target... not that I'd know or anything... ;)

(Bakerella gives great instructions and step-by-step pictures if you want to see it there. I just give a basic overview.) Place peanut butter cups in the freezer until firm. Remove from freezer and carefully remove the wrappers. (Otherwise, too much chocolate gets stuck on the wrapper when unwrapped at room temperature.) Let come to room temperature once unwrapped (so that you can stick the lollipop stick in each without it cracking).

Melt a few chocolate chips in a bowl in the microwave. Dip the tip of each lollipop stick into the melted chocolate and carefully insert into the wider part of each peanut butter cup (when the pb cups have come to room temp, otherwise, they'll crack). Don't pierce through to the other side!

Now, moving your attention to the squares, take a small dollop of your melted chocolate on a toothpick and "paint" a small blob in the center of each square as well as a "tail" for the tassel to adhere to. Adhere a rainbow chip in the middle of each square and a strip of sour belt to form the tassel. You'll have to cut the tassels down a little bit so they hang over the edge of each cap at the right length to look like a graduation cap.

When the caps have dried, use more melted chocolate to adhere them to the top of each grad cap. Stick into a styrofoam block to dry, or, the ghetto inkpadchocolate method, which is a shotglass. Hey, it's graduation, right? ;) The styrofoam will keep the caps more upright though. Oh well; you get the point! I was in a hurry as always!

Congrats, A!

Related Posts with Thumbnails