How I made it this long without knowing about bakerella is totally beyond me, but what a talented blogger. And just in time too. My friend over at ieatDC graduated from law school recently, and I knew that making her these graduation caps with her school's colors on the tassels would totally make her day! (Without hesitation, she put the whole huge thing in her mouth at once.) :)
These are pretty easy to put together, with some patience and the right supplies. Colors are customizable. :)
These are pretty easy to put together, with some patience and the right supplies. Colors are customizable. :)
 Graduation Caps
Miniature peanut butter cups, chilled in the freezer
Godiva squares*
Airheads Extremes Rainbow Berry Sweetly Sour Belts, cut into strips by color**
Lollipop sticks (the Wilton brand is available at Michaels or Party City)
Small handful of chocolate chips, melted (this is your "glue")
Rainbow chip sprinkles (mine are from a Williams-Sonoma ice cream topping kit; other small candies will do as well)
*Apparently found at World Market, for a price; after feeling up all the chocolate bars at Wegmans, I bought a Wegmans brand bar of chocolate that had squares approximately proportionate for the square part of the cap—but the Wegmans logo is on top, unfortunately. They were also thicker than the Godiva squares, but I was not making one more stop with chocolate already in the car trying to melt!
**I'm going to save you the trouble and let you know you can only find these at 7-Eleven in this area... not Wegmans, Safeway, CVS, Giant, Walmart, Target... not that I'd know or anything... ;)
 (Bakerella gives great instructions and step-by-step pictures if you want to see it there. I just give a basic overview.) Place peanut butter cups in the freezer until firm. Remove from freezer and carefully remove the wrappers. (Otherwise, too much chocolate gets stuck on the wrapper when unwrapped at room temperature.) Let come to room temperature once unwrapped (so that you can stick the lollipop stick in each without it cracking).
Melt a few chocolate chips in a bowl in the microwave. Dip the tip of each lollipop stick into the melted chocolate and carefully insert into the wider part of each peanut butter cup (when the pb cups have come to room temp, otherwise, they'll crack). Don't pierce through to the other side!
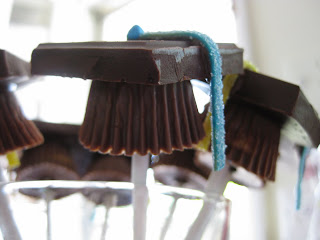
Now, moving your attention to the squares, take a small dollop of your melted chocolate on a toothpick and "paint" a small blob in the center of each square as well as a "tail" for the tassel to adhere to. Adhere a rainbow chip in the middle of each square and a strip of sour belt to form the tassel. You'll have to cut the tassels down a little bit so they hang over the edge of each cap at the right length to look like a graduation cap.
When the caps have dried, use more melted chocolate to adhere them to the top of each grad cap. Stick into a styrofoam block to dry, or, the ghetto inkpadchocolate method, which is a shotglass. Hey, it's graduation, right? ;) The styrofoam will keep the caps more upright though. Oh well; you get the point! I was in a hurry as always!

Congrats, A!
2 comments:
I still love these with all my heart!!
Here's the recipe I promised you (though it's probably more suited to winter): http://orangette.blogspot.com/2008/12/like-winter-and-warmth.html
For summer, try her French-style lemon yogurt cake. The woman is a goddess!
Post a Comment