Sunday, December 28, 2008

Happy Holidays!!

From my kitchen to yours, Happy Holidays!!

May your holidays be fun...

and golden...

and steeped in tradition*...

and snow-capped...

and drunken...

and perfect.


*Kiss up to Miss ieatdc in order to get her grandmother's mandel bread recipe. :)

Chocolate Rum Balls

My husband's coworker made rum balls for the office, and he brought one home for me... and wow. I would totally be drunk after just a few! I had never had one before, and intrigued, decided to make my own as this year's holiday treat for my family. (Even though my dad claims that bourbon balls are even better!) I found this recipe in Martha's cookie book, but it's also available on her site.

I had no idea what they were made of though. Would you believe brownies?! A batch of thin brownies is broken in pieces and rum is added until they're moist and rollable. That's it. Awesome.

Chocolate Rum Balls
3/4 c. (1 1/2 sticks) unsalted butter, cut into pieces
6 oz. semisweet chocolate, finely chopped
3 large eggs
1/2 c. packed light-brown sugar
1 t. vanilla extract
1/2 t. salt
3/4 c. all-purpose flour
1/4 c. plus 2 T. dark rum
Coarse sanding sugar, for rolling (I used a light green for Christmas!)

Preheat oven to 350. Coat a 12x17-inch rimmed baking sheet with cooking spray; set aside. Melt butter and chocolate in a small heatproof bowl set over a pan of simmering water, stirring occasionally. Set aside.

Whisk together eggs, brown sugar, vanilla, and salt in a large bowl. Stir in chocolate mixture, then fold in flour. Pour batter into prepared baking sheet. Spread evenly with a rubber spatula. Bake until top is shiny and a cake tester inserted into center comes out with some crumbs attached, about 10 minutes. Let cool completely on a wire rack.

Break up brownie into small pieces; transfer to the bowl of an electric mixer fitted with the paddle attachment. With machine on low speed, pour in rum, and mix until crumbs start to come together to form a ball.

Shape into 1-inch balls and roll in sanding sugar to coat (I swirled them in a bowl of the sugar, similar to how I do snickerdoodles and chocolate crinkles). Transfer to a baking sheet; refrigerate, uncovered, until cold, about 2 hours. Serve chilled or at room temperature. Rum balls can be refrigerated in an airtight container up to 1 week.

Merry Christmas!

Chocolate Crinkles

I, again, needed more treats for a cookie exchange, an office party, and for holiday gifts, and after renting Martha's new cookie cookbook from the library, I chose these chocolate crinkles (she calls them crackles, I prefer crinkles...) after browsing through her "soft and chewy" chapter. With two types of chocolate, a pretty pattern on top, and a chewy consistency, I knew they'd be perfect. Plus, they make me think of snow!

Chocolate Crinkles
Yield: about 5 dozen, depending on size

8 oz. bittersweet chocolate, finely chopped
1 1/4 c. all-purpose flour
1/2 c. cocoa powder
2 t. baking powder
1/4 t. salt
8 T. (1 stick) unsalted butter, room temperature
1 1/2 c. brown sugar, firmly packed
2 large eggs
1 t. vanilla extract
1/3 c. milk
1 c. sugar
1 c. confectioners' sugar

Melt chocolate in a double boiler or a good nonstick pan, stirring constantly. Set aside and let cool. Sift together flour, cocoa, baking powder, and salt in a bowl.

In the bowl of a heavy-duty electric mixer fitted with the paddle attachment, beat butter and brown sugar until light and fluffy, 2 to 3 minutes. Add eggs and vanilla, and beat until well combined. Add melted chocolate. With mixer on low speed, alternate adding dry ingredients and milk until just combined. Divide the dough into quarters, wrap with plastic wrap, and chill in the refrigerator until firm, about 2 hours.

Preheat oven to 350 degrees. Remove one portion of dough at a time from the refrigerator. Divide each portion into approximately 16 one-inch balls. Roll each in granulated sugar to coat, then in confectioners' sugar to coat fully. (I recommend handling the dough as little as possible; I had a small bowl for granulated sugar and another for confectioners' sugar and dropped several balls in at once and swirled them around the bowl without handling them.) Place the cookies 2 inches apart on a Silpat-lined baking sheet. Bake until cookies have flattened and the sugar splits, about 14 minutes.

Transfer from oven to a wire rack to let cool completely. Store in an airtight container for up to 1 week.

Note the time lapse! Raw then cooked!

Chocolate Cupcakes a la Georgetown Cupcake

Ahhh, the holidays are upon us and so is my return to chocolate recipes. Thanks for your patience as I got through fall, aka pumpkin and apple season. :) I needed to make several treats for various holiday parties, and I was in the mood for a good cupcake. Georgetown Cupcake, the quaint bakery in ritzy Georgetown, is my favorite cupcakery in the DC area. I think their cakes are moist, the frosting fluffy and perfectly piped on, and the creative decorations on top are just right! You will not be disappointed with the chocolate ganache cupcake!!!! Heaven!

Well, you know you've made it big when you show up on Martha, and the sisters who own and run the shop did just that recently... and shared the recipe for their basic chocolate cupcake. (The recipe on Martha's site also lists their vanilla frosting recipe, but seriously people, I don't believe in vanilla and you should know this by now.)

While I thought it was delicious, it certainly tastes better in the store itself, but I'm not about to purchase French butter, etc. However, I'll keep this one in my recipe stash. Mmmmm...

Avert your eyes. These cupcakes are naked...

Georgetown Chocolate Cupcakes
1 1/4 c. all-purpose flour, sifted
1/2 t. baking soda, sifted
1/4 t. salt
1 c. milk
1 1/4 t. pure vanilla extract
1/2 c. (1 stick) unsalted butter, room temperature
1 1/4 c. sugar
2 large eggs, room temperature
1/2 c. cocoa powder, sifted

Preheat oven to 350 degrees. Line a standard muffin tin with 12 cupcake liners; set aside.

In a large bowl, whisk together flour, baking soda, and salt; set aside. In another bowl, stir together milk and vanilla extract; set aside. (To save yet another bowl, I just added the vanilla to the glass measuring cup I used to measure the milk!)

In the bowl of an electric mixer fitted with the paddle attachment, cream together butter and sugar until light and fluffy, about 5 minutes. With the mixer on low, add eggs, one at a time, mixing well after each addition. Add flour mixture in three parts, alternating with milk mixture; beat until just combined. (Inkpadchocolate's note: OMG it smelled so awesome at this point!) Add cocoa powder and beat until just combined. (OMG it smelled even better here!)

Fill each muffin cup two-thirds full with batter. (IPC's note: My cupcakes barely rose; I recommend filling them higher.) Transfer to oven and bake until a cake tester inserted into the center of a cupcake comes out clean, 18 to 20 minutes. Let cool in pans for two minutes before transferring to a wire rack to cool completely.

Frost with tooth-decaying frosting of choice. I chose my favorite Irish Cream Frosting, but you can do vanilla. I won't hold it against you. :)

Yes, admittedly, I frosted these at midnight and didn't have time for the frosting to warm up.

Tuesday, December 2, 2008

Giada's Apple Crostata

I puffy heart Giada. Some might say I'm obsessed with her. In any case, she comes up with completely delicious creations that aren't that hard to assemble, and this crostata is no exception. I made it twice and it's just so pretty and flaky and good. I even used her crust recipe for my Thanksgiving pumpkin pie! Be sure to follow the crust recipe carefully; using chilled butter and ice water is very important to any good crust.

Since I still had leftover apples from apple picking, I didn't use Golden Delicious or Pippin, but whatever I had on hand, and it worked out just fine.

Apple Crostata
Crust:
1 1/2 cups flour
2 T. sugar
1/2 t. salt
10 T. (1 1/4 sticks) unsalted butter, chilled, cut into 1/2-inch pieces
3 T. ice water

Filling:
2 small Golden Delicious apples, peeled, cored, cut into 1/8-inch slices
1 Pippin apple, peeled, cored, cut into 1/8-inch slices
1/4 c. plus 1 T. sugar
1 t. lemon juice
1 large egg white, beaten with 1 T. water (for egg wash)
2 T. sliced almonds, toasted, for garnish (I omitted)

To make the crust: Mix the flour, sugar, and salt in a food processor. Add the butter. Pulse until the mixture resembles a coarse meal. Add the ice water and pulse until moist clumps form. Gather the dough into a ball; flatten into a disk. (If the dough still crumbles and does not form into a ball, add another tablespoon of ice water.) Wrap the dough in plastic and refrigerate until firm, about 1 hour.

For the filling: Position the rack in the center of the oven and preheat the oven to 400 degrees. Combine the apples, 1/4 cup of sugar, and lemon juice in large bowl; toss gently to blend. Set aside for 10 minutes.

Meanwhile, dust a large sheet of parchment paper with flour and roll out the dough on the paper to an 11-inch round. Transfer the dough on the parchment paper to a heavy large baking sheet. Spoon the apple mixture over the dough, leaving a 2-inch border. Fold the dough border over the filling to form an 8-inch round, leaving the apples exposed in the center. Pleat loosely and pinch the dough to seal any cracks. Brush the crust with the egg wash and sprinkle with the remaining 1 tablespoon of sugar. (Note: Mine leaked apple juices both times I made this, despite pleating, and the juices burned the cookie sheet. Just watch it closely or don't add all the apple juices left in the bowl when you assemble the crostata.)

Bake the crostata until the crust is golden and the apples are tender, about 40 minutes. Transfer the baking sheet to a rack; cool for 10 minutes. Slide a metal spatula under the crust to free the crostata from the baking sheet. Cool the crostata to lukewarm. Sprinkle with the almonds and serve. (Or cut right into it and top with vanilla ice cream while it's still hot!!)

Find the maple leaf cutout amongst the same-colored apples and you win a prize. :)

Monday, October 13, 2008

Fall Treats: Five-minute Pumpkin Spice Pudding

My college roomie snatched this super quick recipe from a magazine a few years ago and I have no idea where it's from exactly, but I have been making this simple pudding every fall since. I usually force myself to wait until October to make it, but some years, I just can't wait that long!

With just four ingredients, and the option of making this fat free, it's an easy choice when that autumn pumpkin craving arrives. It's very much like the inside of a pumpkin pie, but much creamier... and easier!

Five-minute Pumpkin Spice Pudding
1 package (5.1 oz.) vanilla instant pudding mix
1 can (12 oz.) evaporated milk (may use fat free variety)
1 can (15 oz.) pumpkin pie filling (not pure pumpkin)
1 t. pumpkin pie spice (or any combo of cinnamon, clove, nutmeg, ginger you like!)

Beat together pudding mix and evaporated milk. Refrigerate 5 minutes. Mix in pumpkin pie filling and spice. Refrigerate 10 more minutes until set.

Could it be any easier?

Sugar Cookie Cut-outs with Buttercream Frosting

My college roommate Jen is getting married this November and I decided that I would make pretty wedding cake cookie favors for her shower. I knew that I didn't want to use royal frosting this time, since I tend to wait to the last minute and royal frosting takes a very long time to harden 100% (and I had to drive to PA with these things!) so I decided on a traditional buttercream instead. Buttercream, when exposed to the elements, hardens quite nicely and lends itself better to decorations.

For those in the area, if you haven't been to Fran's Cake and Candy Supplies in Fairfax, you really should. She recently moved to a new and larger location near the intersection of 50/Lee Highway and Main Street/236 and Sallee, the owner, has everything from cookie cutters to fondant to piping bags to premade frosting roses. For this project, I picked up a wedding cake cookie cutter and some edible pearls and sanding sugar in green, the bride's favorite color.

I again decided to go straight to the source—Martha, of course—for the perfect vanilla buttercream, and I ended up choosing this one, developed by Billy's Bakery in NYC.

This was a little experimental, but I think it worked out very well. Oh, and I was sure to make extra incase more came than RSVPed or if some broke in transit! The bride and guests LOVED them and kept asking where we bought them! :) Mission accomplished!

Sugar Cookie Cut-outs with Buttercream Frosting
Cookies: (same recipe as here)

Buttercream Frosting:
1 c. (2 sticks) unsalted butter, room temperature
6 to 8 c. confectioners' sugar
1/2 c. milk
1 t. vanilla extract

In the bowl of an electric mixer fitted with the paddle attachment, cream butter until smooth and creamy, 2 to 3 minutes. With mixer on low speed, gradually add 6 cups sugar, milk, and vanilla; mix until light and fluffy. If necessary, gradually add remaining 2 cups sugar to reach desired consistency.

Wait until the cookies are completely cool before frosting. As for technique, I covered the entire top of the cookie with my favorite Ateco offset spatula (the smallest one!), trying to make it as smooth as possible with long horizontal strokes. Then, to achieve a cleaner edge, I followed the line of the cookie edge with the edge of the spatula to clear away any stray/ragged frosting.

You should affix any sprinkles or other decorations while the frosting is still wet. You might need to put a small dollop of frosting onto the back of any decorations (like the edible pearls) that want to roll away! I also put some frosting in a piping bag and used my smallest tip to make a few horizontal lines to differentiate the layers of the cake.

And of course, let the frosting dry completely before putting the cookies in cellophane bags. I promise they'll still taste great.


Happy shower, Jen!

Fall Treats: Apple Spice Cake with Caramel Glaze

My friends Amanda and Margaret and I went apple picking out in Loudoun County and had a lot of fun doing so... but all those apples! What to do with them? Once I found this recipe, it was clear: make this recipe four times. :) I became a little obsessed with this one!

I made it into cupcakes several times (cook it for much less time), but my favorite is just as a Bundt cake. This is the perfect apple cake: crunchy exterior, moist interior, and a sweet glaze. Of course it's from epicurious!! We went apple picking too late for Golden Delicious to still be around, but I just used a combination of several varieties (York, Crispin') and it was perfect.

Apple Spice Cake with Caramel Glaze
Nonstick vegetable oil spray
3 cups all purpose flour
2 teaspoons ground cinnamon
1 teaspoon baking soda
1 teaspoon salt
1 pound Golden Delicious apples, peeled, cored, cut into 1/3-inch cubes
1 cup + 1 cup (packed) brown sugar
1 1/2 cups vegetable or canola oil
1 cup sugar
3 large eggs
4 teaspoons vanilla extract
3/4 cup pecans, coarsely chopped (about 3 1/2 ounces)

1/2 cup (1 stick) unsalted butter
1/4 cup milk

Preheat oven to 350. Spray 12-cup Bundt pan with nonstick spray. Sift flour, cinnamon, baking soda, and salt into medium bowl. Transfer 3 tablespoons flour mixture to Bundt pan and tilt to coat. Set pan aside. Place apples and 2 tablespoons flour mixture in another medium bowl; toss to coat apples. Combine 1 cup brown sugar, vegetable oil, 1 cup sugar, eggs, and 3 teaspoons vanilla in large bowl. Using electric mixer, beat until mixture is thick, about 4 minutes. Gradually beat in remaining flour mixture. Fold apple mixture and pecans into batter; transfer to prepared Bundt pan.

Bake cake until tester inserted near center comes out clean, about 1 hour. Transfer cake in pan to rack. Let stand while making caramel.

Melt butter in heavy small skillet over medium heat. Whisk in remaining 1 cup brown sugar, then milk. Continue to whisk until topping is smooth and blended and comes to boil, about 5 minutes. Whisk in remaining 1 teaspoon vanilla. Spoon 1/4 cup hot caramel topping over bottom of warm cake in pan. Let stand until topping is absorbed into cake, about 15 minutes. Turn cake out onto platter. Pour remaining warm topping over cake. Let stand until cool, at least 1 hour. (Can be made 1 day ahead. Cover with cake dome. Let stand at room temperature.)

Peanut Butter Chocolate Cream Pie

My mom adores cream pies. Chocolate cream pies and coconut cream pies are her top two (and my dad asks for a banana cream pie every father's day and birthday)... I guess I have cream pie parents. For mother's day this year, I made her favorite chocolate cream pie, so for her birthday, I wanted to switch it up slightly. For as long as I can remember, my mom's favorite has been peanut butter chocolate anything, and I take after her in that regard. So what better birthday treat than a peanut butter chocolate cream pie?!

I enjoyed this pie because the flavors are separate (not too much chocolate, nor too much peanut butter) and it's pretty when you slice it since it has two layers. And it's quite easy! Another rave for epicurious!

Peanut Butter Chocolate Cream Pie
1 9-inch Oreo or graham cracker crust
4 large egg yolks
2/3 c. sugar
3 1/2 T. cornstarch
3 c. half and half
1 T. unsalted butter
1 t. vanilla extract
1 c. (6 ounces) semisweet morsels
1 c. (6 ounces) peanut butter morsels
1 c. chilled whipping cream
2 T. powdered sugar

Place yolks in medium bowl. Combine sugar and cornstarch in heavy medium saucepan. Whisk in half and half. Bring mixture to boil over medium-high heat, whisking constantly. Boil 1 minute. Whisk half of mixture into yolks to prevent curdling. Return yolk mixture to saucepan. Boil 1 minute, whisking constantly. Remove from heat. Stir in butter and vanilla.

Place chocolate chips in medium bowl. Add 1 cup hot custard and stir until chocolate chips melt and mixture is smooth. Add peanut butter chips to remaining custard in saucepan and stir until peanut butter chips melt and mixture is smooth.

Spread chocolate mixture evenly into prepared crust. Gently spoon peanut butter mixture over chocolate, spreading to edge of crust. Place plastic wrap atop pie to prevent skin from forming. Cool pie on rack 1 hour. Refrigerate until set, about 2 hours. (Can be prepared 1 day ahead.)

For the topping, just prior to serving: Using electric mixer, beat whipping cream in medium bowl until soft peaks form. Add powdered sugar and beat until stiff peaks form. Gently spread topping on top of pie. Sprinkle with grated semisweet chocolate, if desired.

Happy birthday, mom!

Friday, September 12, 2008

Sugar Cookie Cut-outs with Royal Icing

As we get into fall, the next few recipes will probably be "not chocolate"... but still delicious, so forgive me. The first are my cut-out sugar cookies with royal icing. And when I say "mine," I of course mean Martha's. :) However, the recipe my mom uses is not Martha's and yet it was nearly identical, so I assume that this is the ultimate sugar cookie recipe. Moms and Martha agree!

For those of you who have not been to the Outer Banks of North Carolina, you should go at least once. OBX isn't anything like Delaware or Maryland beaches. There isn't a trashy boardwalk; there's history (pirates, Civil War, and WWII), wild horses, fabulous lighthouses, and after Labor Day, desolate beaches.

The four main lighthouses are Currituck, Bodie, Hatteras, and Ocracoke. Each has a very distinct look to it, so I decided that for our annual trip to Hatteras Island that I'd make unique lighthouse sugar cookies. The best icing for details is royal icing. It dries very hard and you can put it into a piping bag to outline the cookie, then you thin out the icing with water or milk so that you can "fill" the cookie. The thin icing will only spread as much as the thicker icing's border. Yes, only I would do this. But I think I did a pretty good job, no?


Currituck (brick)


Bodie (horizontal stripes; Scout & Boomer make great models!)


Hatteras ("America's Lighthouse"... apparently purple dye bleeds...)


Ocracoke (short and fat) :)

My husband would like to point out that the yellow M&M "lights" were his idea. :) Also, please note that these weren't necessarily the best ones, but the ones that didn't break on the trip. :(

Sugar Cookies
4 c. all-purpose flour
1 t. baking powder
1/2 t. salt
1 c. unsalted butter, at room temperature
2 c. sugar
2 eggs
2 t. vanilla extract

Sift flour, baking powder, and salt into a large bowl; set aside. Put butter and sugar into the bowl of an electric mixer fitted with the paddle attachment. Mix on medium speed until fluffy. Mix in eggs and vanilla. Reduce speed to low. Gradually mix in flour mixture. Divide dough into 2 pieces; flatten each into a disk, and wrap in plastic. Refrigerate until firm, at least 1 hour (or overnight).

Preheat oven to 325 degrees. Let 1 disk of dough (or a partial disk, as they warm up too quickly sometimes) stand at room temperature just until soft enough to roll, no more than 10 minutes. Roll out dough on a lightly floured work surface to 1/4 inch thick, adding more flour as needed to keep dough from sticking. Using cookie cutters, cut out shapes. Transfer to baking sheets (I HIGHLY recommend the Silpat...) as you work. Repeat with remaining dough.

Bake until edges turn barely golden, about 15 minutes. Transfer cookies to racks; let cool completely.

Mock Royal Icing...
2 c. powdered sugar
3 T warm water
food coloring of choice

1. OUTLINE. Put sugar and water into a stand mixer (recommended) with a paddle attachment. Beat at a relatively high speed until it resembles a smooth (sickeningly sweet) white icing—be patient! It'll take a little bit. Since I generally recommend white icing as an outline, save your food coloring for step two.

Pour some of the icing (keeping enough icing to fill each cookie later) into a piping bag with a very small tip—a #2 or #3. Carefully outline each cookie and each detail you wish to make. Think ahead as to how you'd like to separate the colors in step two and create a border there. Let dry thoroughly.

2. FILL. Add 1 teaspoon of water at a time to the icing remaining in the bowl—you may only need that 1 teaspoon, so be patient. Mix again on high speed until the water is incorporated and the icing runs off the tip of a spoon. The goal of this type of frosting is to be runny enough that it'll fill up until the outline from step one. Use your judgment.

If using colors, pour desired amount of frosting into several ramekins and create fun colors using food coloring (the box generally gives good ideas of color concoctions to reach desired results). One color at a time, pour colored icing into a clean piping bag with a slightly smaller tip than in step one. Starting at the white outline, trace the outline then fill the cookie with color in a sweeping motion. It won't be perfect if this is your first time, but using the tip to help move some of the frosting around will help it better cover the entire cookie surface. And unless you love cavities, try not to use TOO much icing. Just use the tip while not squeezing down on the bag to help move blobs of frosting to areas with less. If using sprinkles or any other decorations, do so now. Let dry very thoroughly, up to 24 hours if packaging.

Pour yourself a drink because this is hard work! (the cleaning up is especially bad)

I should mention that this is mock royal icing because traditional royal icing uses either egg whites or meringue powder as an egg substitute. I was doing this last minute and didn't want to bother. And I knew this would work equally well. :)

I did sailboats and sea turtles too!

Drunken Chocolate Toffee Trifle

So I'm super far behind on updating the blog, but you may think this one's worth the wait. This sweet treat is perfect for any time of year (although I made it in August for our house party, whoops).

I'm always intrigued by Paula Deen's desserts (although nowhere near my obsession with Giada) because they're usually pretty creative. I would have never thought to bake a cake from a box but then pour alcohol on top of it while it cooled!

If you're strapped for time, just buy some hot fudge and cool whip at the store. I won't tell. ;)

Drunken Chocolate Toffee Trifle
1 box chocolate cake mix (Duncan Hines recommended)
1/2 c. Kahlua (or other coffee liqueur)
2 c. fudge sauce, recipe follows (or one 16-ounce jar fudge topping)
3 Heath or Skor bars, roughly chopped into pieces (I used more)
1 1/2 c. heavy cream, whipped and sweetened with 1/3 cup sugar

Prepare the cake according to the package directions for a 13x9-inch pan. Cool thoroughly. Prick the entire top of the cake with a fork. Pour Kahlua over the cake and allow it to soak in. Cover with plastic wrap and refrigerate for at least three hours. Slice the cake into 1-inch cubes.

Line the bottom of a large glass bowl with a single layer of cake cubes. Pour 1/4 of the warm fudge sauce over the cake, top with 1/4 of the candy bar bits, then 1/3 of the whipped cream. Repeat layering two more times ending with fudge sauce and candy bits. Refrigerate until ready to serve.

(Assemble the trifle shortly before serving or it will get soggy.)

Hot Fudge Sauce
4-oz. bar German chocolate
1/2 oz. unsweetened chocolate
8 T (1 stick) butter
3 c. powdered sugar
1 2/3 c. evaporated milk
1 1/4 t. vanilla extract

To make the sauce: Melt the chocolate with the butter in a saucepan over very low heat. Stir in the powdered sugar, alternating with evaporated milk and blending well. Stirring constantly, bring the mixture to a simmer over medium heat. Simmer until the mixture becomes thick and creamy, about 8 minutes. Stir in the vanilla.

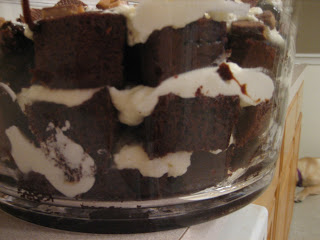
Scout (in the background) asks that you party guests please drop some, thank you.

Saturday, August 16, 2008

Bake Sale: "Gold Bar" (i.e., Caramel, Roasted Almond) Brownies

I made these brownies as part two of my bake sale goodies, and they sold equally as fast. Tip: label your brownies as homemade and use the buzz words caramel and roasted almonds, and they'll be gone in a flash!

I have just been so pleased with all of Fran's recipes so far, and this was possibly the most delicious brownie I've ever had. Something about watching the caramel bubble as it cooked in the oven stirred me deeply! If you're not an almond fan, by all means, omit them, but they really add a nice crunch and depth, especially roasted. But the brownie base itself is just awesome plain too.

Apparently, the Gold Bar is one of Fran's best-selling chocolate bars. She started making these brownies in her shop with the leftover Gold Bar scraps, but this recipe is for the home baker without an endless supply of Gold Bars. :)

Gold Bar Brownies
1 c. store-bought caramel sauce
8 oz. (1 2/3 c.) whole almonds
1 lb. semisweet chocolate
1.5 oz. unsweetened chocolate
1 stick + 2 T. unsalted butter, room temperature
3/4 c. + 2 T. packed brown sugar
2/3 c. sugar
1.5 t. vanilla extract
3/4 t. instant espresso powder (I omitted)
3 large eggs
1 3/4 c. cake flour, sifted then measured

Preheat oven to 325 degrees. Lightly butter a 9x13" sheet pan. Place whole almonds on a separate baking sheet and toast in the oven for 10 minutes or until fragrant. Let cool then roughly chop into 1/4-inch pieces. Set aside.

Finely chop 12 ounces (not all!) of the semisweet chocolate and all of the unsweetened chocolate (1.5 ounces) for melting. In a separate pile, chop the remaining 4 ounces of semisweet chocolate into 1/4-inch chunks, to serve as chocolate chips.

Melt the finely chopped semisweet and unsweetened chocolates in a double boiler or a good pot over low heat. Remove when nearly melted and continue stirring until smooth.

In a mixer fitted with a paddle attachment, beat together the butter and the two sugars until light and very fluffy, 3 to 5 minutes. In a small bowl, stir together the vanilla and the espresso powder (if using espresso powder; if not, just go to the next step).

Add vanilla/espresso mixture to butter mixture and beat to combine. Add the eggs, one at a time, beating well between additions and scraping the bowl several times. Pour in the melted chocolate and beat to combine.

Remove the bowl from the mixer and FOLD in the sifted cake flour by hand until no traces of white remain (it might take a little while). Fold in the 4 ounces of semisweet chocolate chunks and toasted almonds (I actually skipped the almonds at this point and placed them on top of the brownie batter once it was in the pan instead). The batter will be very thick. Evenly spread the batter in the prepared 13x9" pan.

Spoon the caramel sauce in tablespoon-sized dollops over the top. Using a table knife drawn through the batter, swirl the caramel into the batter to marbelize. (Toss on the almonds now if you haven't already!)

Bake for 45 minutes. When tested with a toothpick in the brownie portion (not the caramel!), it will have moist crumbs when done. Let cool in the pan one hour (important!) and cut into squares.

Welcome to molten caramel heaven!

Bake Sale: Homemade Peanut Butter Cups

I can't imagine a more divine combination than peanut butter and chocolate. In fact, I still have the taste of a Nutrageous bar on my lips right now. Mmmmmmmm.

So when my office had a bake sale to raise money for a reading program for inner-city kids, I knew that homemade peanut butter cups would be a big hit and would raise a lot of money. However, I had no idea just how popular they'd be: the bake sale sellers, not the customers, bought my treats up before the sale even started. I packaged them in bags of two, and the last bag had to be split among two people so they wouldn't fight each other for it!

Anyway, I owe this recipe to goodthingscatered, but geez, I can't believe I never thought of this myself! You don't have to temper the chocolate, but I was paranoid that my beautiful pb cups would melt on Metro. I'm melllllllltiiiiiiiiiiiiiing!

Homemade Peanut Butter Cups
semisweet chocolate chips
creamy peanut butter
(just buy a bag of one and a jar of the other and that'll be enough!)

Set out paper candy cups. Slowly melt a handful or two of chocolate chips in a double boiler or a good nonstick pot.

[The following step is NOT required, but it worked really well for me. As Fran says, "If you're one of those folks who thinks life is too short to stuff cherry tomatoes, you may not have the patience for tempering chocolate."

Tempering is the process of melting, cooling, then melting chocolate again in order to realign the crystals in the cocoa butter. Ever made truffles and wonder why they don't look professional and glossy? You haven't tempered the chocolate. Tempered chocolate gives a nice *snap* when broken and is really glossy. For this and other recipes, use a clip-on candy thermometer to ensure you do this properly.

As you slowly melt the chocolate on your stovetop, stir until the thermometer reaches 115 degrees, but no higher than 120. Remove from heat and stir until the mixture cools to between 82 and 84 degrees. Yes, it takes time. Lots of time. Once the chocolate is at the appropriate temperature, return to heat and stir until it reaches 88 to 90 degrees—no more. This may only take 10 seconds! (If it goes above 90, start the process over...)

88 to 90 degrees is the perfect temperature for dipping, which is why I suggest you work one handful of chocolate chips at a time—you need to work quickly!]

So, tempering madness aside, scoop a small blob of melted chocolate into a paper candy cup. Then a small blob of peanut butter. Then top with another blob of melted chocolate. Make a cute swirl on the top :) and refrigerate to set.

(notice varying stages of the setting process)

DEVOUR!

Thursday, July 24, 2008

Tea Party: Chocolate Chip Shortbread

I recently threw a tea party for some of my *gasp* Internet friends. Throw yourself a wedding, find theknot.com, and you'll quickly know what I mean.

Although my inspiration was British, my obsession is chocolate. Here's the menu:

Cream scones
Blueberry streusel scones
Lemon curd
Mock Devonshire cream
Pumpkin chocolate chip bread
Dark chocolate digestive biscuits (only McVities will do)
Cadbury Flakes
Egg salad tea sandwiches
Cucumber tea sandwiches
Goat cheese and watercress tea sandwiches

and

Chocolate Chip Shortbread
1 stick butter, diced (save the wrapper)
3/4 c. flour
3/8 c. cornstarch
1/4 c. sugar
1/4 c. semisweet chocolate morsels

Preheat oven to 325 degrees. Grease a 9-inch loose-bottom fluted tart pan (mine was 10.25 inches and turned out just fine, but watch it during cooking) with the remaining butter from the butter wrapper. Sift the flour and cornstarch into a large mixing bowl. Stir in the sugar, then add the butter and rub it in (or "cut" it in with a fork, two knives, or dough blender) until the mixture starts to bind together.

Turn into the prepared tart pan and press evenly over the base. Prick the surface with a fork. Sprinkle the chocolate morsels and press lightly into the surface.

Bake at 325 for 35–40 minutes, or until cooked but not brown. Cut into portions. Let cool in the pan for 10 minutes, then transfer to a wire rack to cool completely.

YUMMM.

Related Posts with Thumbnails