Sunday, July 12, 2009

Six Ingredient No-Bake Cherry Cheese Pie

I don't always have time for an elaborate recipe, especially in summer when I don't want the oven on and the frozen pina coladas are beckoning. ;) This would be perfect for the upcoming Labor Day... though I made this for July 4 and am just now blogging while at the beach. :)

This is a simple, no-fail recipe for a delicious pie. Sure, you can make it a little bit more homemade by making a graham cracker crust or a regular crust, but why bother if you don't have to bake the rest? This recipe is just from a simple online search. The cheese part isn't quite like cheesecake, but a slightly tangy cream cheese. Enjoy!


Six Ingredient No-Bake Cherry Cheese Pie
Store-bought graham cracker crust (reduced-fat or regular)
8 oz. cream cheese (I use reduced-fat Neufchatel)
14 oz. sweetened condensed milk (I use fat-free)
1/3 c. lemon juice (sure, fresh would be great, but RealLemon is my friend)
1 t. vanilla extract
21 oz. store-bought cherry pie filling (or blueberry, or...)

Using a hand-held or stand mixer, beat cream cheese until fluffy then add sweetened condensed milk until well combined. Mix in lemon juice and vanilla. Pour into graham cracker crust. Chill for at least 3 hours, or until set, in the fridge.

After the 3 hours, take out of the fridge and top with the cherry pie filling. I like to leave a little edge of white so you can see the different colors, especially at July 4th! I also don't use all the cherry syrup, but rather, focus on getting all the cherries and whatever syrup comes with them so that the pie doesn't get too runny. Keep in the fridge until ready to serve.

Saturday, July 4, 2009

Not Chocolate: Patriotic Blueberry Cornmeal Pancakes

Browsing through one of my favorite blogs, bakerella recently featured a recipe from the June 2009 Martha Stewart Living magazine. Oh my. I had to make these pancakes.

Full of sweet blueberries (purchased at a stand on the way home from Harper's Ferry), crunchy cornmeal, and tangy buttermilk, these were such a hit!

And, it was fun to make them extra patriotic... by making a star shape out of the blueberries as you drop them onto each pancake, when you flip them, the star is cooked in on the back side. :) Adorable! That was a nice surprise.


Patriotic Blueberry Cornmeal Pancakes
from Martha Stewart Living, June 2009

1 c. all-purpose flour
1/2 c. cornmeal
1/4 c. sugar, plus 2 t. for blueberries
1 1/4 t. baking powder
1 t. salt
1/2 t. baking soda
1 1/2 c. buttermilk
1/4 c. milk
3 T. butter, melted and cooled
1 egg lightly beaten
2 c. blueberries
Extra butter for coating griddle
Maple syrup

Whisk together dry ingredients in a large bowl. Set aside.

Whisk together buttermilk, milk, melted butter, and egg in medium bowl.

Add milk mixture to dry ingredients and whisk together just until combined. (Lumps are ok!)

Toss blueberries in a bowl with 2 t. sugar.

Heat a griddle over medium heat. Melt butter over surface of griddle. (Repeat as necessary throughout the process.) Drop batter on griddle using a 1/4 c. measure each time. Add sugared blueberries to each pancake, in a star shape if you like! Cook for about 3–4 minutes then carefully flip and cook for another 2–3 minutes.

To keep pancakes warm, I put a piece of foil in a 225 degree oven and pile the cooked pancakes on the foil as I make the next batch on the griddle.

Now that's a pancake.

Saturday, June 27, 2009

How to throw an ice cream bridal shower :)

As a fun little rest from typical food blogging, I thought I'd show off the decorations I did for my best friend's bridal shower.

To say that Sara likes ice cream is a bit of an understatement. Take my obvious love of chocolate, change it to ice cream, and multiply it by 10. Seriously. When I visited her in grad school, we had mudslides when I got there at night, ice cream for breakfast in town, s'mores for an afternoon snack, a normal dinner (with dessert, probably), then ice cream for breakfast the next morning. :)

So, naturally, I always envisioned an ice cream bridal shower for her.

Ice cream cookie cutter favors:


Dressed up with stamped labels and cupcake ribbon from Michaels:


Shower invitations (name smeared out for internet safety!) I made with help from Design-her Gals. An ice cream cone accessory = freaking awesome.


Ice cream sundae glasses with peony "ice cream" and long sundae spoons from Williams-Sonoma several years ago. (The handles are imprinted with ice cream, gelato, sorbet, and sherbet.)


How I set up the entry table. Note the ice cream favors in their own sundae glasses, pink M&Ms from Michaels in sundae glasses with the long spoons again, and a framed invitation (the mat was the cute polka dot wrapping paper I found at A.C. Moore that reminded me of ice cream!).


Sara even got ice cream lingerie and this cute apron! And one of my gifts was this from C&B.

A good shot of the table set up for dessert. Among other things, ice cream cone cupcakes (friend made), ice cream bonbons from Trader Joe's (in cupcake mini muffin paper liners from Michaels), and the rest of the "ice cream" peonies and ice cream scoops between the flower arrangements for extra emphasis... just incase you haven't caught on yet.


Happy shower, Sara!!

Captain Crunch Chocolate Chip Cookies

After making my famous Captain Crunch chicken* for my friend's bridal shower, I had lots of leftover Captain Crunch in the cupboard. For most people, this wouldn't be a big issue. And while I love cereal and have it every morning, I didn't grow up with sugary cereal and with the exception of Lucky Charms, I think they're all way too sweet for my 5:30 a.m. breakfast.

It was quite serendipitous then that Peabody would post her recipe for Captain Crunch chocolate chip cookies the week I had leftovers!

Deliciously salty, this recipe produces a thin, crisp cookie. I used regular (not mini) chocolate chips that I already had on hand, and added more than a cup of them... shocking, I know. :)

*Ask nicely, and I'll share, but this isn't a chicken blog. :)

Captain Crunch Chocolate Chip Cookies
from Culinary Concoctions by Peabody

1 c. unsalted butter, at room temperature
2 c. granulated sugar
2 eggs
1 t. vanilla extract
1 ¾ c. all-purpose flour
1 c. Captain Crunch Flour (pulverized Captain Crunch – It takes about 2 ½ cups Captain Crunch cereal to make flour. Just place in food processor and pulse until it becomes powdery.)
1 t. baking soda
1 t. salt
1 c. (or more...) chocolate chips

Preheat oven to 375 degrees F.

Using a stand mixer, combine the butter and sugar, and beat on medium-high for about 3 minutes.

Add eggs, one at a time, scraping down the bowl after each addition. Add vanilla and beat for another 30 seconds. Reduce to low speed and add the flour, Captain Crunch Flour, baking soda, and salt. Mix until completely combined. Add chocolate chips and mix until fully incorporated.

Spray baking sheets with cooking spray or use a Silpat. Use a cookie scoop to form cookies and drop onto sheet. Bake at 375 for 9 minutes. Let cool on sheet for 3 minutes, then move to rack to finish cooling.

He certainly wants some of these...

Monday, May 25, 2009

Not Chocolate but Pure Summer: Blueberry Coffee Cake

I have been making this recipe for years, and while it's not at all chocolate, blueberries scream summer and scream July 4th, so I thought it would be a good time to share the recipe.

I make this coffee cake every year for Memorial Day, July 4th, and for most breakfast meetings/brunches. It's quite sweet and I have altered the recipe a little bit. Feel free to tweak it to make it more healthy too!! Yikes, Paula!

It's a little curious that it's apparently both a Paula Deen recipe and a Pillsbury Bake-off winner? Hmmm. In any case, enjoy! It's even better for dessert with vanilla ice cream. :)

Blueberry Coffee Cake
1/2 c. packed light brown sugar
1/2 t. ground cinnamon
1 (12-oz.) can buttermilk biscuits (or as close to 12 oz. as you can find)
1/2 c. (1 stick) butter, melted (I usually use only 1/4 c. and melt just a little more if needed)
1 c. quick-cooking rolled oats
1 1/2 c. fresh or frozen blueberries (frozen works perfectly well)
1/2 c. sugar (or to taste; it's to sweeten the blueberries)

Preheat oven to 375 degrees F.

Grease a 9-inch square baking dish with the butter wrapper or cooking spray. In a small bowl, combine brown sugar and cinnamon and mix well with a fork. Separate biscuit dough into 10 (or however many come in the roll) biscuits. Cut each biscuit into quarters, and lightly dip each piece in melted butter and coat with brown sugar mixture. Arrange in a single layer, covering the entire bottom of the baking dish. Sprinkle with 1/2 cup of the oats.

Combine blueberries and sugar in a separate bowl and toss to coat. Spoon over oats and biscuits and sprinkle with remaining 1/2 cup oats. Drizzle remaining melted butter on top (I find this unnecessary, by the way). Bake for 20-30 minutes or until cake is golden brown and center is done. (It always takes me way more than 20 minutes; use a spatula to gently lift up a corner edge of the cake to see if it's still gooey or if it has cooked through.) Serve warm.
Sunday, May 24, 2009

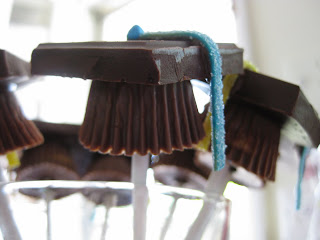
Wish-it-were-my-idea-graduation-caps

How I made it this long without knowing about bakerella is totally beyond me, but what a talented blogger. And just in time too. My friend over at ieatDC graduated from law school recently, and I knew that making her these graduation caps with her school's colors on the tassels would totally make her day! (Without hesitation, she put the whole huge thing in her mouth at once.) :)

These are pretty easy to put together, with some patience and the right supplies. Colors are customizable. :)

Graduation Caps
Miniature peanut butter cups, chilled in the freezer
Godiva squares*
Airheads Extremes Rainbow Berry Sweetly Sour Belts, cut into strips by color**
Lollipop sticks (the Wilton brand is available at Michaels or Party City)
Small handful of chocolate chips, melted (this is your "glue")
Rainbow chip sprinkles (mine are from a Williams-Sonoma ice cream topping kit; other small candies will do as well)


*Apparently found at World Market, for a price; after feeling up all the chocolate bars at Wegmans, I bought a Wegmans brand bar of chocolate that had squares approximately proportionate for the square part of the cap—but the Wegmans logo is on top, unfortunately. They were also thicker than the Godiva squares, but I was not making one more stop with chocolate already in the car trying to melt!

**I'm going to save you the trouble and let you know you can only find these at 7-Eleven in this area... not Wegmans, Safeway, CVS, Giant, Walmart, Target... not that I'd know or anything... ;)

(Bakerella gives great instructions and step-by-step pictures if you want to see it there. I just give a basic overview.) Place peanut butter cups in the freezer until firm. Remove from freezer and carefully remove the wrappers. (Otherwise, too much chocolate gets stuck on the wrapper when unwrapped at room temperature.) Let come to room temperature once unwrapped (so that you can stick the lollipop stick in each without it cracking).

Melt a few chocolate chips in a bowl in the microwave. Dip the tip of each lollipop stick into the melted chocolate and carefully insert into the wider part of each peanut butter cup (when the pb cups have come to room temp, otherwise, they'll crack). Don't pierce through to the other side!

Now, moving your attention to the squares, take a small dollop of your melted chocolate on a toothpick and "paint" a small blob in the center of each square as well as a "tail" for the tassel to adhere to. Adhere a rainbow chip in the middle of each square and a strip of sour belt to form the tassel. You'll have to cut the tassels down a little bit so they hang over the edge of each cap at the right length to look like a graduation cap.

When the caps have dried, use more melted chocolate to adhere them to the top of each grad cap. Stick into a styrofoam block to dry, or, the ghetto inkpadchocolate method, which is a shotglass. Hey, it's graduation, right? ;) The styrofoam will keep the caps more upright though. Oh well; you get the point! I was in a hurry as always!

Congrats, A!

Peabody's Chocolate Pecan Triangles

For Mother's Day this year, M and I hosted our moms for a tea. Unlike with most guests, our moms fortunately share our chocolate obsession—we didn't have to worry about providing less decadent options like we sometimes do with other dinner guests. ;) Also, we didn't even bother with anything savory... my kind of tea party!

Lately I have been following the blog Culinary Concoctions by Peabody. I really like her material because unlike some of my other favorite dessert blogs, Peabody makes things that, while totally creative and one of a kind, are still easy enough for a moderately experienced baker to handle, without being too over the top. Warning, her pictures will totally make you drool.

I had been eyeing her Chocolate Pecan Diamonds for a long time, and this seemed the perfect opportunity to take the plunge. Not only did the moms LOVE them, so did the dads (they got goodie bags)—and so did I. This recipe totally won me over. It's like super rich and chewy fudge on top of a crunchy, buttery crust. Makes me happy. Thanks, Peabody!

Please click the link above for her original recipe, but I did make a few changes and would like to make a few notes.

1. "Pecan dough" and "pecan filling" section: To toast the pecans, scatter them on an ungreased cookie sheet in a single layer and cook them in a preheated 325 degree oven for 10 or so minutes, tossing them a few times during cooking. This really releases the flavors and aroma of the nuts, but if this is just an extra step for you, you don't *have* to do it. But I do agree that it adds a lot of flavor and texture.

2. "Pecan filling" section: I used 2 cups of semisweet chocolate chips rather than milk chocolate chips, but that's also because I buy semisweet chips in bulk at Costco. ;)

3. "Pecan filling" section: I used 10 oz. of milk chocolate chips rather than a milk chocolate bar that I chopped—mostly to save time and not have to clean another cutting board/knife. ;)

4. "To make the filling" section: When she says to "Remove the pan from oven, and use a spatula to smooth the chocolate. I choose to make a marbled effect since the chocolates were different shades of brown."—this was a disaster for me. When I tried to marble it, the milk chocolate chips would pull up the already baked chocolate beneath it and there was no way it would end prettily. Next time, I'll leave visible chips on top.

5. Finally, I couldn't follow the instructions to make diamonds. M had to rip the ruler out of my hands because the moms were arriving in less than five minutes. So, triangles it is!!

I really hope you try this recipe. It's really a great one. I filed it under favorites and everything. :)

Cinco de Mayo: Chocolatey Empanadas

I decided to make chicken empanadas for Cinco de Mayo dinner this year, and with the leftover dough, my mind naturally drifted toward chocolate.

Using this dough and instructions as a base, I added different combinations of fillings. Chocolate chips with cinnamon, Nutella, peanut butter and chocolate chips—the possibilities are endless!

Although a cornmeal dough was a little strong for delicate fillings, it was still yummy and really pretty too.

And, to make sure each had a nicely browned exterior, I used the leftover egg whites to make an egg wash and brushed it over the top of each and finished with a generous sprinkling of sugar or cinnamon sugar.

Well, and chocolate syrup too, of course. :)

Sunday, April 26, 2009

Friendly Post-Passover Reminder

Have leftover matzo meal? Don't know what matzo meal even is?

Just a friendly reminder about my favorite cookies, i.e., not your average Passover hockey pucks.

This year, with better pictures!


Friday, April 10, 2009

Passover/Easter: Flourless Chocolate Torte

Since Easter was during Passover this year, I helped my mom make a flourless chocolate torte for Easter dessert so that all in my multi-religioned family could enjoy it. ;) This chocolatey treat can be for any occasion though. It is super easy to throw together too—just be sure to serve it hot and with ice cream. :)

Flourless Chocolate Torte
from Southern Living

Unsweetened cocoa
Two 8-oz. packages semisweet chocolate squares, coarsely chopped
1/2 c. butter
5 eggs, separated
1 T. vanilla extract
1/4 c. sugar

Preheat oven to 375 degrees. Grease a 9-inch springform pan and dust with unsweetened cocoa. Set aside.

Melt chopped chocolate and butter in a heavy saucepan on low heat, stirring until smooth. Remove from heat.

Whisk together egg yolks and vanilla extract in a large bowl. Stir about a 1/4 cup of egg mixture into warm chocolate mixture to temper eggs. Gradually stir the chocolate mixture into the remaining egg mixture; whisk until well blended.

Beat egg whites at high speed with an electric mixer until soft peaks form. Gradually add sugar, beating until sugar dissolves and stiff peaks form. Fold one-third of beaten egg white mixture into chocolate mixture; gently fold in remaining egg white mixture just until blended. Spoon batter into prepared pan, spreading evenly.

Bake for 25 minutes. Let stand in pan on a wire rack 10 minutes before running a knife around pan and removing sides of pan. Serve warm. (Don't be too concerned if craters form before your eyes... it happens.)

Crater!

Deliciousness

Related Posts with Thumbnails