This is a belated post, for which I apologize. Who knew that April was a busy month for those who work at accounting firms? Anyway, I have three or four flourless chocolate cake recipes that are taking up space in my dessert binders. (Yes, binders.) This, however, is the one I should have made last year. (a) It has a ganache glaze, (b) it's from Bon Appétit, (c) it has a French name :), and (d) it translates to "The Black Beast." Well, hello there.
You'll want to use bittersweet, not semisweet, chocolate because of the addition of a simple syrup. Semisweet + sugar = too sweet for this sophisticated dessert. This is not your typical fallen flourless chocolate cake; in fact, it's somewhat similar to the chocolate pavé, which would have also been suitable for Passover.
You'll want to use bittersweet, not semisweet, chocolate because of the addition of a simple syrup. Semisweet + sugar = too sweet for this sophisticated dessert. This is not your typical fallen flourless chocolate cake; in fact, it's somewhat similar to the chocolate pavé, which would have also been suitable for Passover.
 La Bête Noire
1 c. water
3/4 c. sugar
9 T. unsalted butter, diced
18 oz. bittersweet chocolate (approx. 3 c. bittersweet Ghirardelli chips for me)
6 eggs, fork beaten
Preheat oven to 350 degrees. Butter 10-inch-diameter springform pan. Line bottom of pan with parchment round (you can trace the bottom part that pops out); butter parchment as well. Wrap heavy-duty aluminum foil around outside of pan, bringing foil to top of rim (this is to protect the torte from the water so nothing seeps in).
Combine the water and sugar in a small saucepan. Bring to boil over medium heat, stirring until sugar dissolves. Simmer 5 minutes. Remove from heat.
Fill a large tea kettle with water and bring to a simmer. Meanwhile, melt the butter in a large saucepan over low heat. Add chocolate and whisk until smooth and glossy. Whisk the sugar syrup into the chocolate; cool slightly (to prevent scrambled eggs!). Add eggs to chocolate mixture and whisk until well blended. Pour batter into prepared pan. Place cake pan in large roasting pan. Place in the oven and add enough hot water from the tea kettle to the roasting pan to come halfway up the sides of the cake pan. (You might need to refill the tea kettle a few times depending on the size of your roasting pan. As long as the water is hot, you'll be fine.)
Bake cake until center no longer moves when pan is gently shaken, about 50 minutes. Remove from water bath; transfer to cooling rack. Cool completely in pan.
 For the ganache:
1 c. heavy whipping cream
8 oz. bittersweet chocolate, chopped
Bring whipping cream to a simmer in a small saucepan over medium heat. Remove from heat. Add chocolate and whisk until smooth. Pour over top of cake still in pan. Gently shake pan to distribute ganache evenly over top of cake. Refrigerate cake in pan until ganache is set, about 2 hours. (Can be assembled two days ahead. Cover and keep refrigerated.)
 Run knife around pan to loosen cake; release sides. Cut cake into wedges and serve with lightly sweetened whipped cream.
Perfection
 Cold Oven Lemon Pound Cake
 Toffee-Chocolate Matzah
 (These pictured matzahs don't even know how lucky they're about to become...)
 Break chilled matzah into pieces. Matzah will keep in an airtight container at room temperature for 4 days, but you may have to keep it in the refrigerator if your kitchen is always hot like ours is!
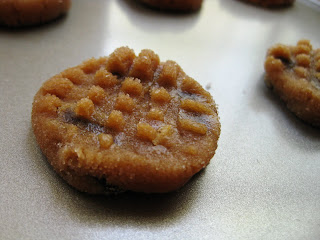 Flourless Peanut Butter Chocolate Chip Cookies
 Place each dough ball onto an ungreased cookie sheet, spacing them 1 inch apart. Using a fork, press on the dough in two directions to form a crosshatch pattern.
 To grind the tea leaves, cut open the tea bags and either empty the contents into a small mini-prep food processor or use a mortar and pestle if you have one. I created my own: I dumped the tea leaves into a small bowl and used the flat head of a meat mallet to grind the leaves down by hand.
 These would be perfect for a springtime tea party!
 Preheat oven to 350 degrees. Cut logs into 1/4-inch slices with a sharp knife. Space 1 inch apart on a baking sheet lined with parchment or a Silpat.
 Rich Chocolate Pudding
 Whisk in the remaining one cup of milk and cook, stirring frequently, for 6 to 8 minutes, until large bubbles break on the surface and the pudding is thick and smooth. Keep in mind: once the lumps form, it's hard to break them—so keep stirring/whisking!
 Remove the pan from the heat and whisk in the vanilla. Pour the pudding into a glass measuring cup with a spout (you'll have about 24 ounces), then immediately and evenly transfer the pudding to four or five serving glasses—I think martini or cosmo glasses make it extra special.
 Now, there are two schools of thought on homemade pudding. I, personally, hate the skin on the top of pudding (it's a rubbery texture thing), but if that sort of thing doesn't bother you, more power to you! If you don't want skin, immediately press plastic wrap directly onto the top of the pudding itself to prevent a skin from forming. Otherwise, just cover the top of the dish with plastic wrap.
 Unfortunately, I didn't have as much time to blog and bake as expected since my employer didn't consider
  But the title of this post isn't extremely bitter chocolate pots de crème. :) Fortunately, I looked forward to making these beauties all week. Even a
  Pour about 4 ounces into each pot de crème cup or ramekin until 1/2 inch from the top. Tap the base of each cup on the counter to remove any bubbles.
 Inside-Out Carrot Cake Cookies
 Drop about 1 1/2 tablespoons of dough per cookie onto prepared baking sheets (I recommend using an ice cream or cookie scoop for even baking and even cookie size), about 2 inches apart, and bake until cookies are lightly browned, 12 to 16 minutes. Cool cookies on cookie sheet about 1 minute then transfer to wire racks to cool completely.
 Toffee Chocolate Chip Cookies
 Bake 10 minutes, until golden. Leave them on the cookie sheet for about two minutes then transfer baked cookies to wire racks to cool.

 "Hi, momma. I waited right here for you to come home."
 Scrape batter into pan(s), and spread until even. Bake until toothpick inserted in center of cake comes out clean: 25–30 minutes in round or square pans; 30–35 minutes in 13x9 pan; 20 minutes for 18 cupcakes.