I was never a huge fan of the Hostess cupcake growing up, but I certainly had it in my lunch from time to time. I guess you could say that although I wanted processed lunches like every other elementary schooler, I was likely a dessert snob from day one. These cupcakes are a great update on a "classic"... can you see vanilla bean flecks (I adore this vanilla bean paste) in the original? Don't think so.
Also? They were fun to make, even if it does include a large chunk of time for cooling/filling/frosting/decorating... and dishes. It was only my second attempt at a filled cupcake (using the cone method), but the results were impressive. I'm making several dozen to bring into work this week (update: it was a huge, huge success)! Check back later too. The cake recipe was so incredibly moist and delicious that I turned this cupcake recipe into a triple-layer cake for my husband's 30th birthday. Details to come!
 Cream-filled Chocolate Cupcakes
makes 24
1/2 c. unsalted butter, room temperature
2 c. sugar
3 large eggs
3/4 c. sour cream (low-fat or regular will do)
1 t. vanilla extract
2 c. flour
2 t. baking soda
1/2 t. salt
1/4 c. cocoa powder
2 oz. dark chocolate (I used 1/3 c. bittersweet morsels)
1 cup water, boiling
Preheat oven to 350 degrees F and line two 12-cup muffin tins (or one muffin tin in two batches!).
In a large bowl, cream together butter and sugar until light. Beat in eggs one at a time, followed by about half of the sour cream and all of the vanilla.
In a small bowl, whisk together flour, baking soda, and salt. With the mixer on, add about half of the flour mixture to the butter mixture, followed by the remaining sour cream, followed by the remainder of the flour mixture, mixing well between additions. Mix just until no streaks of flour remain (overmixing flour = tough cupcakes).
Measure out 1 c. water in a glass measuring cup and microwave until boiling. Whisk cocoa powder and dark chocolate into the boiling water until well combined. Gradually pour "chocolate water" into the batter and stir (by hand—it will splatter if you use the mixer!) until uniform in color.
Evenly distribute batter into prepared baking cups. Bake for 15–17 minutes, until a toothpick comes out clean and the cakes spring back slightly when lightly pressed. Turn cupcakes out onto a wire rack to cool completely before filling or frosting.
Vanilla Cream Filling:
3 T. flour
1/2 c. milk
1/2 c. unsalted butter
1/2 c. sugar
1 t. vanilla extract (or 1/2 scraped vanilla bean, etc.)
Whisk together the flour and milk and cook in a small saucepan over medium heat until thick. This will only take a few minutes. Stir continuously to avoid clumping and do not bring all the way to a boil. When thickened (consistency of a thin pudding), strain with a mesh strainer into a small bowl, cover with plastic wrap, and let cool completely to room temperature.
When the milk mixture is cool, cream the butter and sugar together in a medium bowl until light. Add in the milk/flour mixture and the vanilla and beat at high speed with an electric mixer for 7 minutes, until light and very fluffy. Scrape into a pastry bag fitted with a plain tip (or a large zip-top plastic bag with the corner cut off) and set aside until ready to fill your cupcakes.
Chocolate Buttercream Frosting:
1/2 c. unsalted butter, room temperature
1/2 c. cocoa powder
2–3 c. powdered sugar
1/4 c. milk
1 t. vanilla extract
Cream butter well with an electric mixer. Add cocoa and powdered sugar alternately with milk. Add vanilla. Beat to smooth, thick (but still spreadable) consistency—add more milk a little at a time if needed. Taste often!
Assembly
Take a completely cooled cupcake and, using a small paring knife, cut a cone of cake (1 inch across by 1 inch deep) out of the top. Trim off pointy end of cone (you can eat that!), leaving a flat circle of cake. Set to the side and continue process for all cupcakes.
 Take the cream filling and squeeze a tablespoon or so into each cupcake cavity. Top off with the flat circle of cake to plug up the hole and keep the filling in place.
 Using a small offset spatula, frost each cupcake with a layer of chocolate buttercream. Spread from the center to the sides to evenly cover the cake plug and help prevent tearing/crumbs.
 If you have leftover vanilla cream filling, transfer it to a fresh zip-top bag, cut off a very small opening in one corner of the bag, and pipe a decorative swirl down the center of each cupcake. Store cupcakes in an airtight container.
Here are Miss M's cute swirls!
 Check back at another time for the other recipes (and by "other recipes" I mean the chocolate ones... so whoopie pies!).

 Nigella's Chocolate Peanut Butter Fudge Sauce
 Get out four sundae glasses and put a few scoops of ice cream in each (Nigella recommends toffee, caramel, chocolate, and vanilla).
 SK's Cocoa Brownies
 (What? You don't use garlic and scissors to prevent your parchment from curling? Weirdos. It's all about WHAT YOU HAVE ON HAND.)
 Stir in the vanilla with a wooden spoon (I used a rubber spatula—it's fine!). Add the eggs one at a time, stirring vigorously after each one. When the batter looks thick, shiny, and well blended, add the flour and stir until you cannot see it any longer, then beat vigorously for 40 strokes with the wooden spoon or a rubber spatula. Stir in the nuts, if using. Spread evenly in the lined pan.
 Bake until a toothpick plunged into the center emerges slightly moist with batter, 20 to 25 minutes is Medrich’s suggestion but it took SK at least 10 minutes longer to get them set (me, too). Let cool completely on a rack. (SK goes further and throws it in the fridge or freezer for a while to be able to cut with clean lines.)
 Texas Sheet Cake
 Frosting


 Compost Cookies (from Momofuku Milk Bar, NYC)
 When time is up, on a lower speed, add the flour, baking powder, baking soda, and salt. Mix 45–60 seconds just until the dough comes together and there are no streaks of dry ingredients. Do not overmix the dough.
 (If junk food in cookies is wrong, I don't want to be right.)
 After the hour is up, preheat oven to 400 degrees F. Arrange your chilled cookie dough balls on a parchment or Silpat-lined sheetpan a minimum of 4" apart in any direction. Bake 9–11 minutes (I needed the full 11) or until browned on the edges and just beginning to brown towards the center. While in the oven, the cookies will puff, crackle, and spread. Cool the cookies on the cookie sheet for several minutes before transferring to a cooling rack to cool completely. Store in an airtight container or tin.
 And this photo I shall call parchment (left) vs. Silpat (right). On a Silpat, the cookies kept their shape... just sayin'. I will always prefer the Silpat!!!
 La Bête Noire
 For the ganache:
 Run knife around pan to loosen cake; release sides. Cut cake into wedges and serve with lightly sweetened whipped cream.
 Cold Oven Lemon Pound Cake
 Toffee-Chocolate Matzah
 (These pictured matzahs don't even know how lucky they're about to become...)
 Break chilled matzah into pieces. Matzah will keep in an airtight container at room temperature for 4 days, but you may have to keep it in the refrigerator if your kitchen is always hot like ours is!
 Flourless Peanut Butter Chocolate Chip Cookies
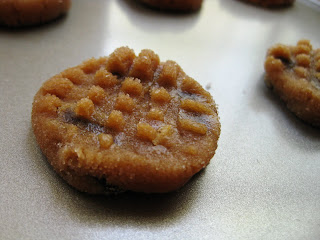
 Place each dough ball onto an ungreased cookie sheet, spacing them 1 inch apart. Using a fork, press on the dough in two directions to form a crosshatch pattern.
 To grind the tea leaves, cut open the tea bags and either empty the contents into a small mini-prep food processor or use a mortar and pestle if you have one. I created my own: I dumped the tea leaves into a small bowl and used the flat head of a meat mallet to grind the leaves down by hand.
 These would be perfect for a springtime tea party!
 Preheat oven to 350 degrees. Cut logs into 1/4-inch slices with a sharp knife. Space 1 inch apart on a baking sheet lined with parchment or a Silpat.