Saturday, May 8, 2010

Texas Sheet Cake

Sorry for the blogging hiatus, but I have a bunch of exciting, super chocolatey recipes waiting in the wings!

I've never been to Texas, but I do love this cake (and that show; hooray, it's back!). I'm no authority on the subject, but from what I've read, this is an old-fashioned, simple, traditional potluck dessert in the South—which was exactly what I needed for an event this weekend. Oh, and it's freaking delicious.

The recipe that inspired me to try it was this one (and I'm grateful to her for the frosting recipe), but I ended up going with an oldie but goodie: a recipe posted in the Washington Post on May 30, 1974 (Thanks, Google)! While almost all recipes were virtually identical, why this one? Sour cream. I'm a sucker for cakes made with sour cream/yogurt/mayo. So moist! But, have a glass of milk ready for this one. It's a stick-to-the-roof-of-your-mouth cake. But who said that's a bad thing?

I'm in a retro mood after a cooking class I took this weekend (details and recipes to come), and what's more, this cake is all beaten by hand with a spoon. No mixer needed!

Texas Sheet Cake
adapted from the Washington Post
1 c. (2 sticks) butter (I used unsalted)
4 T. cocoa
1 c. water
2 c. flour
2 c. sugar
1/2 t. salt
1/2 t. baking soda
2 eggs, fork beaten
1/2 c. sour cream (but milk will do if you don't have it on hand)
1 t. vanilla

Preheat oven to 375 degrees F. Butter and flour* a 13x9-inch pan (called for metal but I only have glass). (*To "flour" a pan when the cake is chocolate, use cocoa so the flour won't show, though it likely won't matter all that much.)

In a medium saucepan, combine the butter, cocoa, and water and bring to a boil.

In a large bowl, whisk together the flour, sugar, salt, and baking soda.

Pour the hot ingredients into the dry ingredients and stir well with a wooden spoon or spatula.

Add the eggs, sour cream, and vanilla and stir until batter is very smooth.

Pour batter into prepared pan and bake for 25 minutes or until a toothpick inserted into the center comes out clean. While the cake is baking, prepare the frosting (it's frosted when warm).

Remove the cake from the oven and place it on a wire rack to cool. Immediately pour the frosting over the warm cake and spread evenly. Let the cake cool completely before cutting.

Frosting
1/4 c. (1/2 stick) butter
3 T. milk
2 T. cocoa
dash of salt
1 t. vanilla
2 c. powdered sugar

In a medium saucepan, combine butter, milk, cocoa, salt, and vanilla. Bring to a boil.

Place the powdered sugar in a large bowl and pour the hot ingredients over the powdered sugar and mix with a wooden spoon until the frosting is very smooth. Add chopped walnuts if desired. Frost cake as indicated above.

Saturday, May 1, 2010

Compost Cookies (aka Pregnancy Craving Cookies)

These are fun cookies. Created by a woman who eats pie for breakfast and ice cream for dinner, these cookies are from Momofuku Milk Bar, a concept that could only work in New York, I think. I haven't had the pleasure of trying the cookies from the actual bakery yet (too much food, too little time), but considering two of my friends individually sent me this recipe, I knew I had to give it a try.

My friend is expecting a little Sprout in July and a few of us decided to throw her a surprise "un-baby shower" (i.e., a party in her honor but without cheesy games that make some moms-to-be uncomfortable), and since these cookies are loaded with, well, junk, I decided to rename them Pregnancy Craving Cookies for the occasion. :)

These are so versatile; you could really add just about anything. I tried to keep it as close to the original as possible (which is apparently potato chips, pretzels, coffee grounds, chocolate chips, oats, and butterscotch chips), but other fun options include Fritos, raisins, Raisinettes, Cocoa Krispies, coconut, peanut butter chips, goldfish, Ritz...

Be sure you allow the dough to cool in the fridge for at least an hour before baking. (Reading the recipe all the way through before starting is always a good thing to do so you can be prepared!) If you like these, you might also like Martha's Cowboy Cookies.

Compost Cookies (from Momofuku Milk Bar, NYC)
1 c. butter, room temperature
1 c. sugar
3/4 c. light brown sugar
1 T. light corn syrup
1 t. vanilla extract
2 large eggs
1 3/4 c. flour
2 t. baking powder
1 t. baking soda
2 t. salt (I used about 1.5 t.)
1 1/2 c. your favorite baking ingredients! (I used chocolate chips and butterscotch chips)
1 1/2 c. your favorite snack foods! (I used ridged potato chips and pretzel sticks, broken into pieces)

In a stand mixer with the paddle attachment, cream butter, sugars, and corn syrup on medium high for 2–3 minutes until fluffy and pale yellow.

On a lower speed, add eggs and vanilla. Increase mixing speed to medium-high and start a timer for 10 minutes. During this time, the sugar will fully dissolve, the mixture will become an almost pale white color, and the creamed mixture will double in size.

When time is up, on a lower speed, add the flour, baking powder, baking soda, and salt. Mix 45–60 seconds just until the dough comes together and there are no streaks of dry ingredients. Do not overmix the dough.

On low speed, add in your favorite baking ingredients and mix for 30–45 seconds until they evenly mix into the dough. Add in your favorite snack foods last, mixing again on low speed until they are just incorporated. (You may need to mix these in by hand a little bit!)

(If junk food in cookies is wrong, I don't want to be right.)

Using an ice cream scoop, portion cookie dough onto a parchment or wax paper lined cookie sheet. (You will not bake on this parchment. It's for refrigerating the dough only; hence, I just used cheap wax paper.)

Wrap scooped cookie dough tightly with plastic wrap and refrigerate for a minimum of 1 hour or up to 1 week. DO NOT BAKE your cookies from room temperature or they will not hold their shape.

After the hour is up, preheat oven to 400 degrees F. Arrange your chilled cookie dough balls on a parchment or Silpat-lined sheetpan a minimum of 4" apart in any direction. Bake 9–11 minutes (I needed the full 11) or until browned on the edges and just beginning to brown towards the center. While in the oven, the cookies will puff, crackle, and spread. Cool the cookies on the cookie sheet for several minutes before transferring to a cooling rack to cool completely. Store in an airtight container or tin.

And this photo I shall call parchment (left) vs. Silpat (right). On a Silpat, the cookies kept their shape... just sayin'. I will always prefer the Silpat!!!

Happy Un-Shower!

Saturday, April 3, 2010

Passover/Easter: Flourless Chocolate Torte II

This is a belated post, for which I apologize. Who knew that April was a busy month for those who work at accounting firms? Anyway, I have three or four flourless chocolate cake recipes that are taking up space in my dessert binders. (Yes, binders.) This, however, is the one I should have made last year. (a) It has a ganache glaze, (b) it's from Bon Appétit, (c) it has a French name :), and (d) it translates to "The Black Beast." Well, hello there.

You'll want to use bittersweet, not semisweet, chocolate because of the addition of a simple syrup. Semisweet + sugar = too sweet for this sophisticated dessert. This is not your typical fallen flourless chocolate cake; in fact, it's somewhat similar to the chocolate pavé, which would have also been suitable for Passover.

La Bête Noire
1 c. water
3/4 c. sugar
9 T. unsalted butter, diced
18 oz. bittersweet chocolate (approx. 3 c. bittersweet Ghirardelli chips for me)
6 eggs, fork beaten

Preheat oven to 350 degrees. Butter 10-inch-diameter springform pan. Line bottom of pan with parchment round (you can trace the bottom part that pops out); butter parchment as well. Wrap heavy-duty aluminum foil around outside of pan, bringing foil to top of rim (this is to protect the torte from the water so nothing seeps in).

Combine the water and sugar in a small saucepan. Bring to boil over medium heat, stirring until sugar dissolves. Simmer 5 minutes. Remove from heat.

Fill a large tea kettle with water and bring to a simmer. Meanwhile, melt the butter in a large saucepan over low heat. Add chocolate and whisk until smooth and glossy. Whisk the sugar syrup into the chocolate; cool slightly (to prevent scrambled eggs!). Add eggs to chocolate mixture and whisk until well blended. Pour batter into prepared pan. Place cake pan in large roasting pan. Place in the oven and add enough hot water from the tea kettle to the roasting pan to come halfway up the sides of the cake pan. (You might need to refill the tea kettle a few times depending on the size of your roasting pan. As long as the water is hot, you'll be fine.)

Bake cake until center no longer moves when pan is gently shaken, about 50 minutes. Remove from water bath; transfer to cooling rack. Cool completely in pan.

For the ganache:
1 c. heavy whipping cream
8 oz. bittersweet chocolate, chopped

Bring whipping cream to a simmer in a small saucepan over medium heat. Remove from heat. Add chocolate and whisk until smooth. Pour over top of cake still in pan. Gently shake pan to distribute ganache evenly over top of cake. Refrigerate cake in pan until ganache is set, about 2 hours. (Can be assembled two days ahead. Cover and keep refrigerated.)

Run knife around pan to loosen cake; release sides. Cut cake into wedges and serve with lightly sweetened whipped cream.

Perfection

Easter: Cold Oven Lemon Pound Cake

It should be no surprise by now that I'm all about the chocolate. In elementary school, I won two successive cakewalks by being on the number 18 (yes I remember what number) when the music stopped. If you won early enough in the evening, you had your choice of alllll the cakes on the table and I'd spend a good 10 minutes inspecting every one, searching for the fudgiest of the bunch. (I'm embarrassed to say that one of those years, I came home with the one my mom made, because really, it doesn't get much more delicious than this and why risk it with some stranger's cake? Mom only made it for my birthday and for the cakewalk. It was special, ok?)

Two summers ago, I made this and this for a bake sale at my office to raise money for a charity we support. You'd be quite surprised to learn that I became absolutely obsessed with a lemon pound cake at the bake sale. After inspecting everything, much like I used to do at the annual cakewalk, it kept calling me back. It was insanely moist and dense and because it seemed to be a treasured family secret, I hesitated to ask the woman for the recipe. But she did tell me that it's a cold oven pound cake.

A what?

It seems to be a Southern thing, but rather than preheating the oven, the cake starts in a cold oven. The gradual increase in temperature does some magic on the batter and affects the crumb, moisture, and density. However, the only cold oven loaf pound cakes I could find online were plain and I desperately wanted lemon for Easter. So this is an Ina recipe that I tweaked to accommodate a cold oven... I intended to make one loaf at Ina's temperature and one with a cold oven, but Safeway only had four lemons left! I'll report back later. :) Ina also makes a glaze, but I didn't—but I did have some issues with the lemon syrup she adds at the end. It just wouldn't absorb, and next time, I might let it absorb in the more porous bottom of the cake then flip it over to finish cooling. Funny, I'm not the only one with this problem. Note that it's important that certain ingredients (as indicated) be at room temperature. Leave the butter out for about an hour so it will cream easily.

This was deliciously tart but not quite as moist as my coworker's cake (which was so moist you could hardly pick up a piece without the weight of it causing it to crumble in half). More butter next time? (pound cake = pound of butter) Still a delicious recipe, perfect for spring. Can easily be halved (I did). For last year's Easter lemon cake, click.

Cold Oven Lemon Pound Cake
Adapted from Ina Garten
2 sticks unsalted butter, at room temperature (save the wrappers!)
2 1/2 c. granulated sugar, divided
4 eggs, at room temperature
1/3 c. grated lemon zest (6 to 8 large lemons)
3 c. flour
1/2 t. baking powder
1/2 t. baking soda
1 t. salt
3/4 c. freshly squeezed lemon juice, divided
3/4 c. buttermilk, at room temperature
1 t. vanilla extract

Grease and flour two 8.5x4.25x2.5-inch loaf pans with leftover butter wrappers or nonstick spray.

Cream the butter and 2 c. of sugar in the bowl of an electric mixer with the paddle attachment until light and fluffy, about 5 minutes. With the mixer on medium, add the eggs one at a time, then the lemon zest.

In a separate bowl, sift together the flour, baking powder, baking soda, and salt. In another small bowl, combine 1/4 c. lemon juice, buttermilk, and vanilla extract. With the mixer running, add the flour mixture and buttermilk mixture alternately to the batter, beginning and ending with the flour. (Why? Because I trust Ina with my life, that's why.) Divide the batter evenly between the pans, smooth the tops, and place in a COLD OVEN. (If you don't want to do this, check the Ina link above for her preheating and temperature instructions.) Close the door and turn the oven to 325 degrees. Cook for 60–70 minutes (mine took 70) until light brown and a toothpick inserted near the center comes out mostly clean.

Combine 1/2 c. sugar with 1/2 c. lemon juice in a small saucepan and cook on low until sugar dissolves. When the cakes are done, allow them to cool for 10 minutes before sliding a knife around them and releasing them from their pans. Set them on a rack over a cookie sheet and spoon/brush the lemon syrup over them (see my note above; you may want to do this on the porous bottom of the cake rather than the crusty top). Allow the cakes to cool completely before slicing.

Happy Spring!

Sunday, March 28, 2010

Passover: Toffee-Chocolate Matzah

I've been meaning to make this recipe for the past few years, especially since I've already tasted the same recipe but with either Saltines or graham crackers and can attest to its deliciousness. A sprinkle of salt on top is key—aim for either sea salt or kosher salt. It rounds out the other flavors so well!

Toffee-Chocolate Matzah
4 sheets unsalted non-egg matzah (or Saltines, or graham crackers)
1/2 c. (1 stick) unsalted butter
1 c. packed brown sugar
2 c. semisweet chocolate chips
sea salt (or other toppings like nuts)

Preheat oven to 250 degrees. Line two baking sheets with parchment paper (less cleanup!). Arrange matzah in an even layer on baking sheets and set aside.

(These pictured matzahs don't even know how lucky they're about to become...)

Melt butter in saucepan on medium-low heat. Once melted, add brown sugar and cook, stirring, until the sugar has completely dissolved, it starts to bubble, and the mixture is pourable—about 5 minutes. Drizzle toffee evenly over matzah and spread with a spatula.

Transfer to the oven and bake until toffee has a rich sheen, 10 to 20 minutes. Remove from oven and sprinkle with chocolate chips. Tent matzah with aluminum foil and let stand 20 to 30 minutes.

Remove foil tent and spread melted chocolate over matzah to cover; sprinkle with sea salt. Transfer matzah to refrigerator and let chill at least 2 hours.

Break chilled matzah into pieces. Matzah will keep in an airtight container at room temperature for 4 days, but you may have to keep it in the refrigerator if your kitchen is always hot like ours is!
Saturday, March 27, 2010

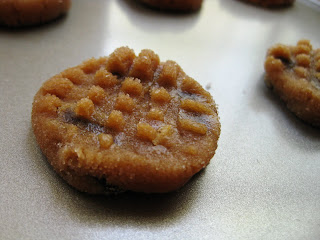
Flourless Peanut Butter Chocolate Chip Cookies

It's that time of year again! Passover baking usually results in fallen cakes, an overabundant use of coconut, or relying on so many egg whites that you start to feel downright wasteful. (Even though those last linked-to cookies remain my very favorite.) Not these cookies! And who doesn't love peanut butter and chocolate?

Flourless Peanut Butter Chocolate Chip Cookies
adapted from Emeril Lagasse, as featured on Good Morning America
1 c. creamy peanut butter
1/2 c. granulated sugar
1/2 c. brown sugar, packed
1/2 c. (or way more...) semisweet chocolate chips
1 egg, fork-beaten
1 t. vanilla extract
sugar for dusting

Preheat oven to 350 degrees. Combine all ingredients in a bowl and stir with a wooden spoon until combined.

Put a few scoops of sugar in a small bowl. Roll about 1 heaping tablespoon of dough between your hands to form a smooth ball then drop each dough ball into the sugar and roll around until coated.

Place each dough ball onto an ungreased cookie sheet, spacing them 1 inch apart. Using a fork, press on the dough in two directions to form a crosshatch pattern.

Bake cookies until puffed and lightly golden, 10 minutes. Important: Remove baking sheets from oven and let cookies cool on the sheets. Otherwise, they will completely crumble. Then remove them with a spatula once cooled enough to transfer to a wire rack to finish cooling.

PB+C=Best Combo Ever

Saturday, March 13, 2010

Earl Grey Tea Cookies

This is a strange recipe. I'm just going to say that from the start. I would never have thought to cut open a tea bag and mix the contents into cookies. However, my husband loves Earl Grey tea so I've had this one bookmarked for a while. I made them for him for Christmas.

If you're a dough eater (come on, who isn't?), you'll be disappointed with this one. The Earl Grey is bitter bitter bitter and raw tasting in the dough, but the heat of the oven cooks the leaves and makes these cookies surprisingly delicate and fragrant. You could easily try other varieties of tea: Darjeeling, English breakfast, Lady Grey, etc.—but even though I wouldn't choose Earl Grey for drinking, it's great in these butter cookies.

To grind the tea leaves, cut open the tea bags and either empty the contents into a small mini-prep food processor or use a mortar and pestle if you have one. I created my own: I dumped the tea leaves into a small bowl and used the flat head of a meat mallet to grind the leaves down by hand.

These would be perfect for a springtime tea party!

Earl Grey Tea Cookies
makes 8 dozen bite-sized cookies
2 c. flour
2 T. finely ground Earl Grey tea leaves (2–4 tea bags)
1/2 t. salt
1 c. (2 sticks) unsalted butter, room temperature
1/2 c. confectioners' sugar
1 T. finely grated orange zest (I wasn't crazy about this flavor, FYI)

Whisk together flour, ground tea leaves, and salt in a bowl.

Place butter, confectioners' sugar, and orange zest, if using, in the bowl of an electric mixer fitted with a paddle attachment. Mix on medium speed until fluffy, about 3 minutes. Reduce mixer speed to low and gradually mix in flour mixture until just combined.

Divide dough in half. Place each half in parchment paper, shape into logs, and roll in parchment to 1 1/4 inches in diameter. Transfer parchment logs to the freezer; freeze until firm, about 1 hour.

Preheat oven to 350 degrees. Cut logs into 1/4-inch slices with a sharp knife. Space 1 inch apart on a baking sheet lined with parchment or a Silpat.

Bake cookies until edges are golden, 13 to 15 minutes. Let cool on sheets on wire rack.

Saturday, February 27, 2010

Rich Chocolate Pudding

During Snowmageddon, I made a homemade chocolate pudding that I had been wanting to make ever since getting the cookbook several years ago. However, I don't always have the best luck with puddings or other egg-based custards. For whatever reason (perhaps just needing more practice), once I add eggs to a saucepan, everything separates and gets really unpleasant and lumpy.

So, I went back to the drawing board and looked for another recipe. There are several methods to homemade pudding. In either, you need a thickening agent. For some, that would be eggs, but an easier way, for me, is cornstarch.

This recipe is good warm or cold, and would even be delicious poured into a pie crust (regular, Oreo, or graham cracker) and topped with whipped cream. (Or check out this one.) Yes, it uses whole milk. Just go for a run before eating it like I did. :) I might use a little less brown sugar next time since the point of bittersweet chocolate is its darkness, but otherwise, this is a good recipe—and you won't have to worry about what to do with a bunch of leftover egg whites.

Rich Chocolate Pudding
makes 4–5 servings
1/2 c. packed brown sugar
2 T. sugar
1/4 c. unsweetened cocoa powder
2 T. cornstarch
1/4 t. salt
2 c. whole milk
4 oz. bittersweet or semisweet chocolate, chopped
1 t. vanilla extract

In a bowl, stir together the brown sugar, sugar, cocoa powder, cornstarch, and salt with a fork until the brown sugar is broken up and the mixture is well combined. Pour into a heavy saucepan (I love my good nonstick one), and add in one cup of the milk and all of the chopped chocolate. Whisk over medium heat until the chocolate is melted and smooth.

Whisk in the remaining one cup of milk and cook, stirring frequently, for 6 to 8 minutes, until large bubbles break on the surface and the pudding is thick and smooth. Keep in mind: once the lumps form, it's hard to break them—so keep stirring/whisking!

Remove the pan from the heat and whisk in the vanilla. Pour the pudding into a glass measuring cup with a spout (you'll have about 24 ounces), then immediately and evenly transfer the pudding to four or five serving glasses—I think martini or cosmo glasses make it extra special.

Now, there are two schools of thought on homemade pudding. I, personally, hate the skin on the top of pudding (it's a rubbery texture thing), but if that sort of thing doesn't bother you, more power to you! If you don't want skin, immediately press plastic wrap directly onto the top of the pudding itself to prevent a skin from forming. Otherwise, just cover the top of the dish with plastic wrap.

This pudding can be served hot, warm, at room temperature, or cool. Store leftovers in the fridge—if there are any.

Sunday, February 21, 2010

Survival Chocolate Pots de Crème

I had a whole post written out about the Snowpocalypse and SNOMG! and Snowverkill and every other cutesy term coined this February as a result of more than two feet of snow here in the metro DC area that descended upon us the week before Valentine's Day, and I hunkered down for a weekend of great baking. On my list: Fran Bigelow's Chocolate Pots de Crème.

Unfortunately, I didn't have as much time to blog and bake as expected since my employer didn't consider metro closures, week-long school closures, an unprecedented four-day closure of the federal government, and absolutely treacherous roads to be reason enough to close the office.

But the title of this post isn't extremely bitter chocolate pots de crème. :) Fortunately, I looked forward to making these beauties all week. Even a 3.5-hour one-way commute on Friday couldn't stop me from the excitement of this dessert. Score another perfect 10 for Fran!

Any time I make a dessert that is time-sensitive or that requires a lot of equipment or care, I make sure everything is ready well before I turn on the burner. For this, I recommend you have the eggs separated and ready to go, a teapot on the boil (it can simmer until you're ready for it), the ingredients measured, chocolate chopped, and the strainer, baking dish, and ramekins ready. It is not, however, a difficult recipe. Promise.

Trust me when I say that you'll want to save this one for a special occasion—but sometimes just surviving the week is reason enough.

Survival Chocolate Pots de Crème
1 whole egg
5 egg yolks
2 T. plus 1 t. sugar
pinch of salt
1 c. heavy cream
1 c. whole milk
8 oz. semisweet chocolate (60% preferred), finely chopped

Preheat oven to 300 degrees F. Set a tea kettle filled with water on the stovetop to boil. Have ready six 5-ounce pot de crème cups or ramekins.

In a medium bowl, whisk the egg and egg yolks with 1 tablespoon + 1 teaspoon sugar and a pinch of salt. Whisk until smooth and the sugar begins to dissolve. Set aside.

In a heavy saucepan, heat the cream, milk, and remaining 1 tablespoon sugar until it comes to just a simmer. Remove from heat and stir in the chopped chocolate. Gently stir until the chocolate is completely melted (be patient!) and smooth (you'll thank me later).

Pour about a third (just eyeball it) of the chocolate mixture into the eggs and immediately stir to combine. Then add the remaining chocolate mixture, gently stirring until smooth without incorporating too much air or too many bubbles. (This will help the texture later.)

Using a rubber spatula to help, strain the custard through a fine-mesh sieve into a large measuring cup. You should have about 24 fluid ounces.

Pour about 4 ounces into each pot de crème cup or ramekin until 1/2 inch from the top. Tap the base of each cup on the counter to remove any bubbles.

If using pot de crème cups, place their hats (lids... whatever) on them—or individually and tightly cover each ramekin with plastic wrap to prevent a skin. With the tip of a sharp knife, punch a small slit in the surface of the plastic wrap so that steam can escape during cooking.

When your tea kettle comes to a boil, arrange the custard cups in a rimmed baking dish or roasting pan and place in the oven. Pour boiling water into the roasting pan around the custard cups to a depth of about an inch to create a bain-marie (a fancy term for a water bath, which ensures even, gentle cooking). If using ramekins, loosely cover the pan with foil.

Bake for 35 minutes (perfect amount of time for my oven), or until the custard is set. If the center moves independently when gently shaken, continue baking.

Serve warm or at room temperature. Refrigerate any portion not devoured.

Happy Valentine's Day!

Other inkpadchocolate V-day recommendations:
Chocolate Soufflés
Aunt Louise's Famous Chocolate Mousse
Chocolate Pavé
Flourless Chocolate Torte

Monday, February 8, 2010

Inside-Out Carrot Cake Cookies

I made these fun cookies a few months back when I still had some leftover matchstick carrots from Scout's birthday—and I'm not really much of a carrot person unless it's in cake. :) I bookmarked this recipe a long time ago and it's simple, has nice presentation, and is super tasty! These cookies are soft, chewy, and just slightly salty—my favorite.

Inside-Out Carrot Cake Cookies
Makes about 11 sandwiches or 22 individual cookies
1 1/8 c. flour
1 t. cinnamon
1/2 t. baking soda
1/2 t. salt
1 stick (1/2 c.) unsalted butter, at room temperature
1/3 c. plus 2 T. packed light brown sugar
1/3 c. plus 2 T. granulated sugar
1 large egg
1/2 t. vanilla extract
1 c. coarsely grated carrots (or matchstick carrots, roughly chopped)
1 c. walnuts, chopped
1/2 c. raisins (I omitted)

Preheat oven to 375 degrees F. Grease two baking sheets or line with a Silpat.

In a bowl, whisk together flour, cinnamon, baking soda, and salt. Set aside.

In a separate mixing bowl, beat together butter, sugars, egg, and vanilla at medium speed until light and fluffy, about two minutes. Mix in carrots, nuts, and raisins at low speed, then add flour mixture and beat until just combined.

Drop about 1 1/2 tablespoons of dough per cookie onto prepared baking sheets (I recommend using an ice cream or cookie scoop for even baking and even cookie size), about 2 inches apart, and bake until cookies are lightly browned, 12 to 16 minutes. Cool cookies on cookie sheet about 1 minute then transfer to wire racks to cool completely.

Cream Cheese Frosting (half recipe of what I use for red velvet):
8 ounces cream cheese, at room temperature
1 stick unsalted butter, at room temperature
1/2 t. vanilla extract
2 c. confectioners' sugar, or to taste

In a large mixing bowl, beat the cream cheese, butter, and vanilla together until smooth. Add the sugar and on low speed, beat until incorporated. Increase the speed to high and mix until very light and fluffy.

Once the cookies are completely cool, make sandwiches with a dollop of cream cheese frosting in the middle.

Related Posts with Thumbnails